
29 December, 2008
21 December, 2008

Smoked Herring
So we were near the smoked salmon at the grocery store, and I saw smoked herring. I'd heard of it, I'd considered trying it, and even through the plastic it smelled like Dietrich's Country Market. Surely it would be awesome.
 When we had smoked salmon on crackers with cream cheese that evening we each tried a little piece plain and then had some on crackers.
It's intense. It's salty. It's best consumed in small quantities.
The remainder will be thoughtfully deployed in dishes that will complement (and dilute) the taste.
 When we had smoked salmon on crackers with cream cheese that evening we each tried a little piece plain and then had some on crackers.
 It's intense. It's salty. It's best consumed in small quantities.
The remainder will be thoughtfully deployed in dishes that will complement (and dilute) the taste.
Parmentier de Hareng Fumé aux Brocolis
 This attempt to use some smoked herring is a derivation of a derivation of a parmentier:
Parmentier, or hachis parmentier, is a traditional French dish of ground meat (usually beef, sometimes a mix of beef and pork) topped with mashed potatoes and oven-baked.
Our version is based on this recipe but employs both broccoli and potatoes.
4 oz fillets of smoked herring
3/4 c. milk (optional, to de-salt the herring if needed)
2 medium potatoes + fixing for mashed potatoes (do not use salt)
1 medium head broccoli
1/3 plain yogurt
pepper
parmesian cheese, fresh
breadcrumbs
If using salted herring, spread out in the bottom of a dish and cover with milk. Let rest in the fridge for at least 3 hours or overnight. Drain, rinse, and pat dry; cut into 1/4"-1/2" chunks before use.
Make your mashed potatoes while preparing the brocculi mixture: Chop and steam the brocculi in the mircowave. Use a masher or food processor to make a paste of broccoli, plain yogurt, and pepper to taste.Preheat the oven to 350 degrees. Spread the mashed potatoes, and layer the chunks of herring over them. Spread the broccoli mixture into the next layer and then sprinkle with the parmesian. Top with a layer of bread crumbs and bake for about 20 minutes. You need only warm everything through and brown the bread crumbs. Serve immediately.
I would recommend serving small potions with a salad or some such. The flavors are very intense, and you can always get seconds.

Chicken Mole Verde
In the beginning there were two people who watched FoodNetwork too much, and they started saying things like "Hey, we should try that!"...
And so we came home from the grocery store one day with two jars of mole sauce: red (traditional/origional) and verde (green). I like green so I decided to try that one first. Is It EDible? and Cyndi's Recipes provided fodder for that we would eventually make; the main difference is that ours is all from the pantry, fridge, and freezer. I meant to take pictures, but we ate it all. It was good.
CHICKEN MOLE VERDE
SOFTWARE:
1 T. olive oil
1 small onion, chopped
3 cloves of garlic, chopped
2 boneless, skinless chicken breasts, cut into 3/4" chunks
1- 8oz. can of mushrooms (2 if you like)
4 oz. mole verde sauce (we used Dona Maria)
2 c. liquid (water, juice from draining mushrooms + water, or broth)
2 t. chicken base
1/2 c. queso fresco, crumbled (or more to taste)
brown rice (1.5 c. + water per package instructions)
HARDWARE:
cutting board + knife
blender
large sauce pan + lid
You will want to prep everything ahead so you can just add ingredients in batches. When you drain the can of mushrooms, pour the liquid into a 2 cup measuring cup and make up the difference with water. Pour some of this into the blender and add the mole paste (yes, you're going to have to chip it out of the jar; no, it's not paste like you were expecting). Add more of the water/mushroom juice as needed, and blend until the chunks are broken up.
Heat your olive oil over medium heat. Saute your onion and garlic for a minute, then add the chicken and lightly brown it on all sides. Stir in the remaining ingredients. Cover, reduce heat to medium-low, and simmer for 20 minutes. Remove lid and simmer an additional 20 minutes so that the sauce can thicken.
Plate over brown rice and sprinkle with some of the queso fresco. Serves 4. This would also be great with turkey.
13 December, 2008


10 December, 2008

07 December, 2008
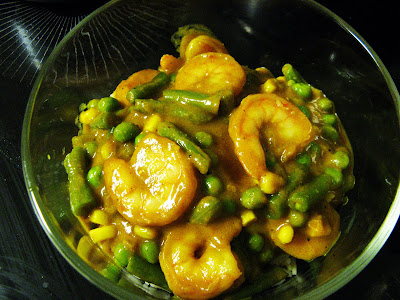
(Goan) Shrimp Curry
This is a version derived from an Indian cookbook that we like to use. The main differences are that we used all dried spices, added mixed frozen veggies, and adjusted the flavor a little for what we, personally, like in our curries. With these changes you can make this recipe from your freezer, pantry, and spice rack; it's great when you don't have time to go to the store. You could serve 4-6 with this recipe, though you may want to throw in some naan or such by the time you get to 6 places. We're still working on the naan.
(Goan) Shrimp Curry:
2t. ground coriander
1t. ground cumin
1/2t. fresh ground pepper
1t. cayenne pepper
1T. red paprika
1/2t. ground tumeric
1t. ground ginger
2t. granulated garlic
3T. water
2T. oil (we used olive with chili peppers in it)
1 medium onion, finely chopped
1 1/4c. water
1 box of frozen squash puree
6c. mixed frozen veggies
14-oz can of coconut milk
1-2t. salt
1T. lemon juice
1 pound shelled shrimp
2t. garam masala
Start your rice, and warm your frozen squash and vegetables in the microwave. Mix the first grouping of spices with about 3T water to make a paste and set aside. Pour your oil into a 10" saute pan (that has a lid for later) over medium-high head. When the oil is hot add the onion and keep it moving until it become translucent. Add the spice paste, the 1 1/4c. water, squash, and the mixed vegetables. After it returns to a boil: cover, reduce heat to medium-low, and simmer vigorously for 10 minutes. Add coconut milk, salt, and lemon juice; return to a simmer. Add shrimp and stir frequently as the curry continues to simmer gently. Everything is done when the shrimp turn opaque; serve over cardamom brown rice.
Cardamom Brown Rice:
2c. brown rice
4ish c. water (read the package)
8 cardamom pods
Follow package cooking instructions. Avoid eating the pods unless you're willing to endure a few minutes of a rather bad taste in the name of having really awesome-smelling breath afterward.
06 December, 2008

30 November, 2008
iHelp™ Management Services
Can't do it yourself? Kittens are here to help! Furniture assembly, food preparation, sleep posture analysis- they do it all!


"Yes, he's doing fine. I'll call you if he screws up."
27 November, 2008
Cats, Plants and Shredders. They just shouldn't mix.

What?
We didn't do anything?
Oh, wait. Okay, maybe we did that.

24 November, 2008

21 November, 2008

18 November, 2008
Enchilada Recipe
So, the other day we decided to make some enchiladas. At first, we were going to use a recipe that a friend from mexico gave me, but, honestly, that really didn't sound all that authentic. At least it didn't match this gringo's preconception of mexican food, so that was good enough.
Here's how we made it:
Ingredients:
2 Chicken Breasts
3/4tsp cumin
1/4tsp chili powder
1/4tsp granulated garlic
1tsp liquid smoke
1 poblano
2 cloves garlic
hot sauce to taste
corn tortillas
16oz queso fresca (crumbly white mexican cheese, could also use Jack, pepper Jack, white American)
1 can of red enchilada sauce (28oz)
Saute:
2 chicken breasts
-salt
-3/4 tsp cumin
-1/4 tsp chili powder
in a covered pan. Near the end of cooking, I added a dash of smoke flavoring, and then allowed the chicken to rest. After allowing it to cool and rest, shred it with a fork
While the chicken is resting, put 4oz of your cheese into a bowl along with the minced garlic and diced poblano and a dash of hot sauce- I found that a chipotle type I prefer tied in with the chicken flavors well.
Shred the chicken using 2 forks and put into the bowl along with the above. Add 20-25% of the enchilada sauce and mix thoroughly. This is where you will now add salt, pepper, more hot sauce, etc, to taste. Remember that the flavours will be ameliorated slightly by the addition of the tortillas and cheese.
Now it's time to roll the enchiladas. Warm your corn tortillas slightly under a damp towel in the microwave. Lightly coat the bottom of your casserole dish with enchilada sauce. Now, simply put your chicken filling into each tortilla in turn, roll, and place into the dish. I would guess we used somehwere around 2 ounces of filling per tortilla, being careful not to over fill. After all of the filling has been used up, pour the remaining enchilada saouce over the enchiladas, put the rest of the cheese over that, and bake at 400 until the cheese is slightly rowned on top.
This turned out to be rather tasty. I'd also recommend throwing a pinch of oregano into the filling, as it's also a traditional mexican herb.
Good Eating.
17 November, 2008

16 November, 2008
so cute... when they're Asleep
I counter this by saying that Shade is currently running around the apartment yowling because Banik is frying Bacon. Ladies and Gentlemen, we have a pork fiend on our hands.


And now Chewie is also running around yowling. /sigh


And now Chewie is also running around yowling. /sigh
15 November, 2008
Cat Scratch Fever
Oh it's a lovely day here in CT- what with the overcast skies and drizzle and fog and thunder. Naturally something like posting a picture or two of kittens will counteract this problem. We're still about 1.5 months behind on Kitten Posts, so I should maybe submit more often....

To control the feline scratching we first got them one of these hanging type scratchers. They hated it. It moved around too much, made noise, and just generally didn't meet their approval. So we looked around and found them a lovely piece of kitten furniture to destroy. Amusingly enough they knew exactly what it was and started trying to scratch on it even before it was fully assembled.

13 November, 2008
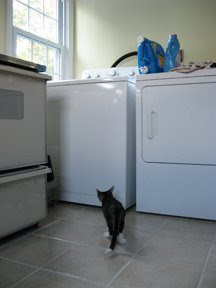
iHelp™ Laundry Protection
I'm pleased to announce that the same fine kittens who brought you the Kitten Alarm Systems™ are introducing a line called iHelp™. I'm sure they will bring you many innovative products in the future, but today I'd like to tell you about iHelp™ Laundry Protection!
If you're tired of critters using your clothing storage for a dining destination iHelp™ Laundry Protection is designed with you in mind. Simply place the Protector into your closet or armoir, and his pointy vigilance will keep away any would-be snackers. iHelp™ Laundry Protection is compact, sturdy, and flexible enough to fit your space availability.


If you're tired of critters using your clothing storage for a dining destination iHelp™ Laundry Protection is designed with you in mind. Simply place the Protector into your closet or armoir, and his pointy vigilance will keep away any would-be snackers. iHelp™ Laundry Protection is compact, sturdy, and flexible enough to fit your space availability.


11 November, 2008
Chewie vs. The Harness
To honor the vets in our families and my neighbor/surrogate-little-sister (who turns all of like, 17 today), I give you: a video of our cat fighting a harness. Get yourself some nice cheese products and enjoy the show.
07 November, 2008
Buttercup Squash Quiche
Howdy folks.
Last night, I decided that the buttercup squash that has been sitting on the kitchen floor for the past week or two needed to have greater aspirations that 'kitten toy in a noisy plastic bag.'
At first, I wanted to make a squash soup, but our curry powder is in another state, so that was out. Instead, I decided that a quiche was the way to go. So, here's how it goes:
Saute` (all chopped)
1 small onion
3 cloves garlic
2-3 slices of bacon
1 tsp oregano
1 tsp salt
1 tsp chili powder
1 T fresh cilantro
1/2c mushrooms
Cook (roast or microwave) your buttercup squash and scrape out the innards from half of it. Let it cool awhile, then mix it with:
3/4c milk
4 beaten eggs
1c shredded cheese (I used white cheddar)
Combine the cooled sauted items and the custard-squash mixture. Pour this into a quiche dished that has been lined with your favorite pie crust.
Bake @ 375 until done. The pie crust will brown and when you shake the dish, the center will not act liquid. Let it rest for 15 minutes or so.
This turned out Very well. The buttercup squash tastes buttery and lends an excellent texture and umami to the quiche. You could leave out the bacon and it'd be vegetarian. And it's all rather healthy- the worst part would be the pie crust, or bacon >.>
Anyway, enjoy!
02 November, 2008
Kittens' First Autumn
At the end of September the trees of CT started turning, and I brought the boys their first leaf. They weren't really sure what to do with it, but they were curious. The next morning we found it shredded on the bathroom floor.


Feline Games
Have we mentioned that the cats enjoy gaming? They don't play much themselves, but they do enjoy helping Banik play Team Fortress 2. Chewie happily provides point-blank observation, tactical critiques, and class recommendations whenever Banik wants. And some times when he doesn't.


18 October, 2008
Squash with Maple Syrup and Pecans
This can go several different ways depending on your desired outcome. You can make this as is, chunky or mashed, as a side dish. You can add some brown sugar to make a sweet dessert. Or you can add chunks of cooked sweet Italian sauage to make a savory main dish or side. You could probably do a lot of other things, too. Go nuts.
The basics you will need:
2 moderately sized fall/winter squash
(ie. butternut, acorn, pattypan, cooking pumpkins, and things that look like squashes but are ambiguously named, but not zuchini or summer/yellow squash)
1 Tablespoon of butter
1/2 cup of maple syrup (1/3 c + the rest later)
1 cup roughly chopped pecans
salt to taste
To prepare your squash: cut the ends off, peel and halve, scrape out the seeds, and chop into 1/2" cubes. The cooking method is flexible, but we steamed it in the microwave about 7 minutes since it took the least amount of time, prep, and dirty dishes.
While that's cooking you should start most of your maple syrup and the butter cooking at med-low in a skillet that will be able to hold everything by the end. After about 5 minutes add the pecans and let it cook down for another 3 minutes. (If you want sausage add it and 3 additional minutes before the pecans go in.) Add squash and a little salt; cook covered for about 5 minutes. Add the rest of the maple syrup (and the brown sugar if you chose that adventure), and cook for another 10 minutes or until done. Mash it if you want- or don't. Enjoy.
16 October, 2008
Invalid Command
What's this? Here in my AutoCAD window? How'd that get there? It's as though someone small and furry walked across my keyboard. Or rather, walked halfway across and decided to sit down.


03 October, 2008
and now for something completely different
I give you: A kitten wedged into the side of the couch. Yes, he did that himself.

What does he have to say about me posting this?
"azz s21"
Yes, he did that himself, too. Do you know how hard it is to keep cats from walking on your laptop keyboard?

What does he have to say about me posting this?
"azz s21"
Yes, he did that himself, too. Do you know how hard it is to keep cats from walking on your laptop keyboard?
29 September, 2008
<3 Pumpkins, installment 1
Jack-o-lantern pictures will come later. Mine was a Portal Companion Pumpkin, and naturally I had to cut a heart out of it. Banik toasted the seeds; they're kind of like eating popcorn.


28 September, 2008
Wheat Yeast Doughnuts
*gasp* An actual recipe?! Yes, we're trying to get back into the game, peoples.
Banik made doughnuts a couple days ago based on Alton Brown's Yeast Doughnut recipe, but halved and with a few modifications:
3/4 cup milk
1 1/4 ounces vegetable shortening, approximately 1/6 cup
1 packages instant yeast
1/6 cup warm water (95 to 105 degrees F)
1 egg, beaten
1/8 cup sugar
3/4 teaspoon salt
1/4 teaspoon nutmeg
1/4 teaspoon cinnamon
1 cup AP flour
1 1/2 - 2 cups Whole Wheat flour
2 Tablespoons gluten
Peanut or vegetable oil, for frying (1 to 1/2 gallons, depending on fryer)
[insert picture in the near future]
--- The milk and shortening go into a saucepan over medium heat until the shortening is just melted, and then this is set aside.
--- Pour the warm water into the mixer bowl and added the yeast; allow to bloom for 5 minutes. After it has cooled to lukewarm, add the milk and shortening mixture along with the eggs, sugar, salt, spices, and half of each of the flours. Use the paddle attachment at low speed until combined, and then beat at medium until well mixed. Add the remaining flour in the same manner. Switch to the dough hook and beat for at a medium speed until the dough is smooth and pulls away from the bowl (about 3-4 minutes). Oil the bowl, cover with damp towel, and place somewhere warm to rise until doubled in size (about 1 hour).
--- On a well-floured surface roll out the dough to a thickness of about 1/4" - 3/8". Use a pizza cutter to make strips about 1 1/2" wide and then section into rectangles not more than 4" long. Lay on a floured cookies sheet, recover with the damp towel, and let rise for another 30 minutes.
--- Preheat deep fryer to 365 and perforate doughnuts with a fork to get rid of any large air pockets. Gently add batches of 3-4 to the oil and cook for about 30 seconds a side. Transfer to a cooking rack laid on a newspaper-lined cookie sheet to wick off excess oil. Roll in cinnamon sugar after about 5 minutes or allow to cool 15-20 minutes before glazing.
26 September, 2008
Kitten Alarm Systems™

For those of you who don't have a Kitten Alarm System™ but are considering one, I'd like you to know that the system is very straightforward and easy to install. They don't come with instructions, but like everything else you can find them on the internet. Assuming you don't just disable the system, this is how your mornings will go...
Stage 1: You will be used as a lumpy jungle gym of sorts. If you move you will be tackled and/or clawed. If you don't you will be chewed on and/or clawed. Heavens forbid you attempt to roll over and go back to sleep.

Stage 2: The Kitten Alarm System™ model of your chosing will sit on your regular alarm clock to remind you of how late it's getting. Depending on contrariness (how much attention you have paid to it) it may also step/sit on buttons that turn on the radio or change the time.
The funny thing about this system is that unless hungry, Kitten Alarm Systems™ don't seem to care if you get out of bed. They certainly wake you up; they just don't care if you're productive afterward (by human standards). The only way to physically disable the systems is to place them outside the room and shut the door, but even this does not disable the audio. High-pitched meowing may take several minutes to subside, so I hope you have a soundproof pillow.
22 September, 2008
Synchronized Sleeping

they practice every day
every night
for endless hours
they are relentless in their training
in their quest for the SYNCHRONIZED SLEEPING gold
they are america's team
and they will see you in vancouver
ladies and gentlemen
I give you:
chewbacca & shade
17 September, 2008
more kittens!
These kittens are talented beyond words, and I'm not just saying that because I'm biased. We have photographic proof:
Chewie is mechanically adept, and he enjoys tinkering with malfunctioning appliances.

Shade is an accomplished sommelier- always willing to help you find the perfect compliment to your meal.

And of course both of them enjoy financial and legal advising- as a hobby, of course.

Chewie is mechanically adept, and he enjoys tinkering with malfunctioning appliances.

Shade is an accomplished sommelier- always willing to help you find the perfect compliment to your meal.

And of course both of them enjoy financial and legal advising- as a hobby, of course.
15 September, 2008
introducing: the fluffs
We're all moved up to CT (we hope), but we're still getting sorted out and settled into the apartment. We did go ahead and adopt our kittens yesterday. =D

(both of them asleep on my lap a few hours ago)


(both of them asleep on my lap a few hours ago)
Chewie and Shade (left and right, respectively) are brothers, and they're currently busy getting into whatever they can. I'm sure we'll be posting lots of pictures- maybe even videos- in the future, but right now it's time for bed.

(both of them asleep on Banik last night after the commotion of moving in and exploring)
24 July, 2008
The Middlesex Diner

The Middlesex Diner is a nice little place. Banik and I were coming home from Hershey Park a couple weeks ago and started looking for a 24-hour diner along I-81. A restaurants-at-this-exit sign for exit 52 listed this 24-hour diner, and we happily stopped. The sign proclaiming "Great homemade food and plenty of it" is not lying, and we left happily full (and with some leftovers, iirc) for $20+tip. It almost made up for the crappy food in Hershey Park.
16 July, 2008
Free CF Bulb for the first 1 million requests
Kinda neat that someone would do this. CF bulbs should pretty much be required for more application (over incandescent).
http://www.millionlightsproject.org/
http://www.millionlightsproject.org/
07 July, 2008
Linky
Download:
Superweapons of the Ancient world.
New Yankee Workshop
Been playing a lot of wargames lately, and came across this while at 'work.'
http://www.google.com/coop/cse?cx=010812613448546227331%3Awubxalibev0
Quite cool, actually.
Also,
http://www.fool.com/investing/mutual-funds/2008/07/02/what-to-do-with-5000.aspx
so I can investigate the mutual funds.
Some CT gaming groups?
http://www.theateamgamingclub.com/
http://games.groups.yahoo.com/group/CTUWC/
BT
http://filesharingtalk.com/vb3/f-bittorrent-invites-90/t-what-trackers-worth-with-reviews-and-ratings-298328/?
Search all of Craigslist at once...
http://crazedlist.org/index.cgi#
25 June, 2008
A link worth a thousand words
http://ded.mo.gov/researchandplanning/indicators/cost_of_living/index.stm
Well, I didn't want to lose this, so it goes here! Bwahahahaha!
This is just a page with some cost-of-living index modifiers and a map. It makes one think.
Well, I didn't want to lose this, so it goes here! Bwahahahaha!
This is just a page with some cost-of-living index modifiers and a map. It makes one think.
15 May, 2008
A Terrible Secret

So.
I have a secret. Before I enlighten the bored world, let me go into a bit of history.
In General, I don't really like reality shows. The drama just annoys me. All the infighting, the petty, stupid politics, and the bad editing just kill me. I hate them all.
That being said, I've actually started watching Hell's Kitchen. I enjoy it. I don't enjoy everything that I mentioned above about it, but I Do enjoy the look into a line kitchen. It also gives me ideas of dishes that I need to learn how to cook. However, in my defense, I do watch it on my computer, so I can skip the annoying parts. So, here are some of the ideas.
Paella
Risotto
Flambe
Sugar Work (caramel, candies, etc)
Mousse
Souffle
Sauces (not just the normal stuff)
How to plan a multicourse menu to compliment itself
Anyway, that's it for now.
Sauces (not just the normal stuff)
How to plan a multicourse menu to compliment itself
Anyway, that's it for now.
09 May, 2008
there's never enough R2-D2
This morning Banik sent me a link for commercial by Nikko. If I had absurd amounts of money to burn I could now have an R2-D2 projector and/or webcam of my very very own. Actually one set for me to play with and one set to keep in the original packaging. Banik would have to get his own.
Prices for this awesomeness?
the R2-D2 Projector + Millenium Falcon remote is $2900
the R2-D2 Webcam + Lightsaber remote and IP phone is $400
Prices for this awesomeness?
the R2-D2 Projector + Millenium Falcon remote is $2900
the R2-D2 Webcam + Lightsaber remote and IP phone is $400
05 May, 2008
have yourself a purple cow
For an awesome milkshake combine:
- raspberry sherbert
- vanilla ice cream
- milk
Nobody measures anything for a milkshake, but I can say it was probably about [1 sherbert : 1.5 ice cream] and enough milk to make it work. Introduce to a blender and pour into mugs which have been chilling in the freezer. If you don't need fat drinking straws for the milkshake (ie. not the standard skinny ones) you used too much milk.
This would probably be awesome with any berry sherbert, but then I like berries. And I'd like to try a ratio that is higher in sherbert. And a version that uses vanilla frozen yogurt. And possibly also adding fresh or frozen berries. The possibilities are endless.
Useless factoid: A "white cow" is a vanilla milkshake, and a "brown cow" is chocolate.
Bonus useless factoid: Milkshakes were originally marketed as a health food. (Now that's a health food I could love.)
04 May, 2008
The Lamentable Lost Recipes
On occasion, enLethe and I will cook something for the first time that turns out extra tasty. Unfortunately, we are not always studious when it comes to recording the process. So much for the cornerstone of the scientific method.
There are a couple examples of this that I can think of off the top of my head, the first of which is the bane of enLethe's culinary existence: Fried Zuchinni.
At one point while she was visiting me at school, we made fried zuchinni. It was Excellent, so she claims. All I can remember is that it was deep fried and it involved an egg bath and some seasoned flour with white pepper in it. We'll figure out what it was, one day.
The other is some rice pudding that we made over our last spring break. We used purple sticky rice, which gave it an amazing color, and the pudding itself was excellent. I know I based it on two different recipes for purple sticky rice rice pudding, and that it involved a vanilla bean, german cinnamon, real cinnamon, eggs, milk, and... I don't know what else. I need to research the proportions. 1# of rice.
Anyway, that's all for now. Hopefully we'll post more after the last couple weeks of school are over. Who Knows.
21 March, 2008
sauce dishes
 There are a lot of pretty dishes out there, and when the time comes we'll assemble our own set instead of getting a box of something generic. Sometimes, though, it's hard to choose.
 Sauce dishes are a place where I think it would be more interesting to collect than to choose. There are these ceramic dishes and these glass dishes, and many more to consider. I'm indecisive to begin with....
Instead of having a serving set for 8 or something, we'll probably collect pairs of interesting dishes that we think are neat, and just pick whatever we want to use. This might also carry over to other small dishes and serving bowls or platters. Matching isn't all it's cracked up to be.
Mudflat Gallery
Mudflat Gallery is a little store at Porter Square (Cambridge, MA) that showcases an interesting mix of work from fibers and paper art to glass and ceramics; their website is pretty terrible and useless though. My favourite pieces were the dichroic slump glass dishes done by Judith Copeland, and though her website doesn't do it justice you can see a few more of them at another gallery. Mudflat sells the smaller 3"x3"ish ones for about $14 each, but the craft is very nice. The palette of greens, blues, and violets is obviously appealing to us, and they would easily make a nice set of matching-but-not-identical dishes for something. I have no idea what though. Lisa Knebel also had some noteably nice pottery, which can also be seen at the other gallery's website. Swirly pottery is nice; spotty pottery is ugly.
Cherry Soup?
I've been perusing a book Banik has titled "The Book of Food" which is essentially an encyclopedia of cooking ingredients. (It's a neat book, and most importantly to someone of my background, it has a lot of pictures.) The author often talks about preparation methods of the ingredients, and while reading about cherries I was surprised to discover the eastern European tradition of cherry soup, both hot and cold. I don't care for cherries, but as Banik loves them I thought this was worth a bit of research.
It would appear that Hungarians are most well-known for cherry soup, but the recipes reflect that every family has its own version. All of the versions I found are chilled, but I suppose you can eat anything warm if you like it.
This Cold Hungarian Cherry Soup from Soup-aholic uses:
2 pounds fresh cherries, pitted and stemmed
1 tablespoon fresh lemon juice
1/4 teaspoon ground cinnamon
2 cups plus 2 tablespoons water
2 to 3 tablespoons sugar
1 tablespoon cornstarch
1/4 cup heavy cream, Sour cream or plain yogurt for topping
Orange or lemon zest or mint sprigs for garnish (optional)
This Hungarian Cherry Soup from Chef2Chef is also served cold:
1 lb morello cherries, pitted (pits and stems reserved)
3 c riesling or other dry white wine
1/4 c sugar
1 inch stick cinnamon
2 lemons, 1 peeled & the peel reserved, both squeezed
1/2 c brandy (optional)
2 c sour cream
And this Hungarian Sour Cherry Soup from RecipeSource is yet another version:
1 1/2 quart water
3 tablespoons flour
1 cup sour cream
1/2 teaspoon salt
1 pound fresh or frozen pitted sour cherries (not canned)
3/4 cup granulated sugar
20 March, 2008
of Portals and Cake
So during my spring break visit to the Frozen North, Banik has intoduced me to a little game called Portal. Now we're thinking about trying to make the cake. From the rantings of GLaDOS and the feedback of other people who have attempted this I have assembled a recipe with goes something like this:
THE DRY TEAM
1 (18.25 oz) package chocolate cake mix
2 cups AP flour
1/4 teaspoon baking soda
1/4 teaspoon baking powder
1 teaspoon salt
THE WET TEAM
3/4 cup butter, softened
2/3 cup granulated sugar
1 teaspoon vanilla extract
4 large eggs (+ 3 large eggs? will add as required to balance consistancy)
3/4 cup vegetable oil (at least half replaced with applesauce)
1/3 cup water (we always use milk)
THE FILLING
1 container prepared coconut frosting
THE FROSTING
2- 6 oz OR 12 oz (no idea which is needed yet) containers vanilla frosting
2/3 cup cocoa powder
THE DETAILS
1 cup semi-sweet chocolate chips (we're going with ample minichips for good coverage)
25% of the above vanilla frosting, pre-cocoa additiong (or enough for 8 rosettes)
8 cherries
THE PROCESS
Prepare the frosting the night before and refrigerate; leave ample time for re-warming and workability before icing.
Set oven to 375 and prepare 2-10" pans. Mix the dry ingredients. In a seperate bowl, I would cream the butter and sugar, then add the other ingredients in the order listed; egg quantity will be as noted above. Slowly add in the dry ingredients; adjust consistancy if necessary.
Divide between pans and bake for about 30 minutes or until done. Cool thoroughly before assembling cake; recommendations are to cut this into about 16 slices due to the rich content.
The finished cake should resemble this. Clearly various alterations could be made to get an end appearance more like the original if you're a stickler for details.
05 March, 2008
Quinoa Blackbean Salad Recipe
So this recipe is from a friend of ours. She's totally a California hippy, but we love her anyway.
It's for, as the post title suggests, a Quinoa and Blackbean salad recipe. I had this cold, but I imagine it could also be served hot, perhaps as a bet for enchiladas or a piece of roast chicken.
rinsed black beans and cooked quinoa in the same amount
1 tbs red wine vinegar for every 1.5 cups beans
combine beans, quinoa and vinegar
add chopped chives, red pepper, cilantro, (and corn) to the bean/quinoa mixture
one red pepper for every 1.5 cups beans
at least .5 (1/2) cups lime juice for every 1.5 cups quinoa
cayenne pepper, salt, black pepper to taste
This is pretty tasty stuff, for being healthy ;-) You can add pretty much any vegetable that's in season, or any fresh herbs you happe to have lying around. I'd definitely suggest adding the corn, I like the sweetess it brings to the party. You probably want a little less corn than quinoa or beans, but it's up to you.
And, everybody's favorite part, the variations. All of these are based on the above bse recipe, scale as you see fit.
Throw and asian twist in by adding 1-1.5tsp of toasted sesame oil and substituting Mirin for the red wine vinegar.
Add a little southwest/SoCal flavor by chopping up an avocado and jalepeno to add in, along with a bit of cumin and coriander and/or chipotle seasoning.
Go the Italian route by substituting balsamic for the red wine vinegar, using Basil instead of cilantro, chopping up and adding a tomato, cubing some mozzarella, and using a splash of olive oil to make it all go down smoothly.
What is it with the regional variations toaday?
Oh, yeah, maybe a bit of onion and garlic would be tasty in there also. Everybody loves garlic.
I think that's all that's on my mind for now.
GLHFDD.
Standing Rib Roast (Prime Rib) Recipe
As request, I'm posting the recipe that I use to cook a standing rib roast, which is a prime rib with the bones (the ribs) still attached. After all, everyone knows the sweetest meat is next to the bone.
I am a carnivore. Well, that's not precisely true, I do enjoy vegetables and starches, but a well cooked, or uncooked, piece of flesh is a tough meal to beat. The standing rib roast is not exactly inexpensive, but cooking it at home is much more economical than, say, paying $35 for a 16oz portion out somewhere. Anyway, on to the recipe.
Turn on your oven : 250 F.
Remove your roast from the packaging. Make a note of its weight.
You can do a little bit of trimming at this stage, but not too much. I mean it, leave at least half the fat on there.
Rub it down with olive oil.
Spice it as you see fit. ie:
-Salt & Pepper
-Montreal Steak Seasoning
Place on a rack in a roasting pan. Do Not Cover.
Insert a probe thermometer into the center of the cut, making sure it's not touching any bones.
Put your roast into the oven, and cook until it reaches an internal temperature of 122 F. ***
Remove from oven, cover with foil, shiny side in, and let it rest for At Least 30 minutes. You're waiting for the temp to stop rising. It should stabilize somewhere near 130-132 F. DO NOT REMOVE THERMOMETER!
At this point, you can let the roast sit for up to 2-3 hours, I wouldn't go much further than that.
When you're about 30m away from serving time, remove the foil and pop it into the oven which is at 500 F. for 12-15 minutes. Pay Close attention to it during this time. You want a crust, not a carbonized husk of sadness.
Once your crust is done, remove the roast, let it sit for at least 10 minutes covered with foil.
You are now ready to cut and serve.
There aer a couple important things to note. First, do NOT remove the thermometer until you're ready to start carving. Even then, leave it in if you can. If you remove it at the wrong time, it the resulting puncture into the roast will do its very best to emulate old faithful, spewing forth great gouts of flavorful juices. Those flavorful juices that are supposed to remain in the roast until you have freed them with your diligent mastication.
*** Second, the actual aim point temperature listed above as 122 is a varying number. Treat the aim point temperature as X degrees below you desired final temperature, where X is ~ 1.5 times the weight of your roast in pounds. This number is actually 1-2 times the weight of the roast, but 1.5 is a good generalization.
So here's an example. I want a tasty roast, somewhere around the rare to medium rare boundary (or, another way to put it, I want it a deep pink/light red and warm in the center). This means I want the final temperature to be between 130 and 135 degrees. Now, I need to know how much my roast weights. Let's say that it's a 4-rib roast, and it weighs in at a reasonable 6 pounds. So, I take my 1.5, multiply it by 6, and subtract that number from my final temperature of, say, 133 degrees. That means I get 133-(1.5*6) = 122F.
Funy how it all works out in the end, eh?
So the best way to carve this delectibal delight is as follows. You'll need a long shasp knife, or one of those fancy electric carvers. First, cut along the ribs, so you're separating the large piece of meat from them all at once. To describe it dirrferently, the knife blade will slide along all of the ribs at once as you cut away the meat. Now you should have two pieces. Your ribs, all stuck together, and this large, perfectly cooked loin of beef. The beef loin you may now slice into portions as you see fit. The ribs can either be separated and given to the more feral in your dining group, or frozen/refrigerated for soup/midnight snacks later.
Last. but not least, we have our variations and suggestions, in no particular order. Try one or all of them.
For a more even doneness level throughout, take the roast out of the fridge 2-3 hours before you plan on cooking it. This will start equalizing the temperature throughout, giving a prettier, more even level of doneness throughout the roast.
Before putting olive oil onto the roast, coat it with a bit of liquid smoke.
Dry age the beef prior to cooking. All this entails is putting it into the coldest (bottom rear) part of your fridge for 24-72 hours before cooking. First, remove it from the packaging. Pat it dry. Put it onto a roasting rack in a pan, lightly lay a couple paper towels/couple layers of cheesecloth over it, and then put it in the fridge. Turn it, drain any juice, and replace the towels every 12 hours. This process will make it much more tender and enhance/intensify the flavor. Make sure your refrigerator is below 40 degrees (between 33-38, preferably), otherwise bad thigns could happen.
For a gentler cooking method, use a large terracotta bowl-type planter and water-catching dish for cooking. Place the water-catching dish on the oven rack, put the roasting pan and rack on that, then cover it all with the bowl-shaped planter. The terra cotta piece should be preheated in the oven for 30 minutes prior to this. Cook as normal. This will ameliorate the temperature changes due to your oven cycling on and off and on and off and on and off, acting as a thermal buffer. The terracotta is unnecessary for the crusting stage of cooking, but could still be used if you don't mind playing with 500 degree terracotta pieces. Think of this as shaped pizza stones.
Ok, that's all for now. Happy cooking!
Brownies from Scratch
Well, I have passed another milestone. I recently made my first batch of brownies from scratch. That's right, will all the things I've cooked, all the items I've refused to buy premade and instead made myself, I'd always relied upon a box for brownies. No More, I say! This recipe is easy and Very tasty. It's also rather robust, since it took to my alterations with gusto.
First, the original recipe:
1 stick (4 oz) butter
4 oz bittersweet chocolate
1 cup sugar (all white sugar, or half white/half brown sugar)
1 tsp vanilla
pinch salt
2 eggs
1/2 cup flour
1/4 cup cocoa powder
Preheat oven to 350.
Melt butter and chocolate together.
Stir in sugar, vanilla, and salt.
Beat in the pre-mixed eggs.
Add the flour and cocoa powder.
Put into a 8x8ish greased pan and bake for 18-20 minutes, or until the top is shiny and dry-looking.
And this is what I actually baked:
1 Stick Butter
1 Mashed Banana
8 Oz. Bittersweet chocolate
2 cup sugar (all white sugar, or half white/half brown sugar)
1 tsp vanilla
1 Vanilla bean
1/2 tsp salt
4 eggs
1 cup flour
1/2 cup cocoa powder
The procedure is the same as above, just put the mashed banana in after the sugar's mixed in. This went into a 9x13 greased pan for ~30 minutes at 350. I used both the knife-method and the look of the top to check done-ness. I used giradelli cocoa powder and chocolate for this. The chocolate was 60% cacao.
So, how do they taste? Wonderful. They are literally Great. The banana worked out particularly well, complimenting the rich chocolate flavor and cutting the butter in half, all in one fell swoop. The texture of these brownies is damn near perfect. They're moderately chewy with a slightly cruchy crust on top. The edges are chewier, but not much crunchier. These have kept well for all of 3 days so far, and I don't think the last one will make it much longer.
What other variations am I going to try?
I'll put in creamy peanut butter instead of some of the normal butter. I might go half and half, or figure something else out, since peanut butter is very fatty also.
I'm going to try and find some sort of way to fit some Khalua into the recipe, which might be challenging with the lack of liquids. Perhaps remove a bit of the sugar.
I may try and come up with a method to put some mint flavor in also. Either staight up julienned mint leaves, or melt some peppermint patties into the chocolate, or something.
Speaking of chocolate, I want to try some other kinds of chocolate, after I use up the rest of the bag of giradelli chips. I think I'll go with a 72% dark next time, or maybe 77%. This may be more chocolately goodness than any one man can handle.
Until next time, happy cooking.
23 February, 2008
Some Chinese Recipes
A friend of mine works at a local racetrack/casino in the kitchen. We were talking about cooking over xmas break, and I was lamenting on the fact that whenever enLethe and I attempt General Tso's Chicken, it just... doesn't turn out well. So, a month or two later, I get an email with these recipes in them.
We haven't tried them out yet, but I hope. I Hope.
Beef with Broccoli
Saute 1 tsp ginger and 1 tsp garlic
add 1 tsp sesame oil, 1/4 cup water, 1/4 cup soy sauce
3 tbsp oyster sauce, 3tbsp hoisin sauce
2 tbsp sugar
boil and thinkin with corn starch with water
cook beef and brocc
pour sauce over beef
-----
G. Tso chicken
saute 1 tsp garlic, 1tsp ginger
1 tbsp sesame oil
1tbsp vinegar
1/4 cup soy sauce
1/4 cup water
1tbsp brown sugar
1 tbsp sugar
crushed red pepper to taste
boil and thinkin with corn starch and water
pour over cooked chicken
Here goes nothing!
16 February, 2008
Wheat Bread
As of right now, this is the current wheat bread recipe my mom and Banik have produced. It will change.
2 eggs
1 stick of butter
1/4 c. honey
2 c. warm water
1 T. yeast
3 c. wheat flour
3-1/2 c. bread flour
1/2 c. dry milk
2 t. salt
3 T. gluten
1/2 c. ruffage (ie. wheat bran, flax seeds, or steel-cut oats)
I have no mixing instructions. Recipes at my house often are ingredients, baking temperatures, and baking times. Ask Banik.
Bake at 375 degrees for 30-45 minutes.
My Mixer!
It's a big day for me, today. I've been waiting a long time for this, and the day's finally come.
My mixer arrived today.
I finally decided to get a KitchenAid mixer. The penultimate kitchen tool. Or at least the penultimate kitchen mixing tool...
Anyway, I'm excited, and here's my baby. I believe enLethe and I (read: enLethe, since she's the more artistic one) will be painting blue or green or blue/green flames along the sides of this mixer. I may even have to name it.
What impact does this have on you, the non-existant blog readers, you ask? More recipes that involve bread, or other mixed items.
Huzzah!
"The Absolute Best Cinnamon Rolls in the World"
That was the title of one of the cinnamon roll recipes that I ran across on the interweb. How could I not choose that one?
So, I've made this recipe a number of times, with a couple variations. I will begin with the base recipe, which is pretty good.
1 Packet Dry Yeast
1c. Warm Milk
1/2c. Sugar
1/3c. Melted Butter
1t. Salt
2 Eggs
4c. AP or Bread Flour
--
1c. Brown Sugar
3T. Cinnamon
1/3c. Softened Butter
---
1/2c. Softened Butter
3oz. Creme Cheese
1.5c. XXX Sugar
1/2t. Vanilla
Pinch Salt
So, as you can see, the recipe has 3 parts. The dough, the filling, and the frosting. Here's the basic method.
1. Bloom yeast in warm milk, sugar, butter, eggs
2. Mix remaining dry together
3. After yeast is bloomed, combine with Dry. Mix well, knead for a couple minutes.
4. Rise to 2x size.
5. Roll out dough to ~1/4"
---
6. Preheat oven to 400 F.
7. Spread butter onto dough
8. Spread the Brown sugar and cinamon (mixed together) over the butter
9. Roll this monstrosity up, cut it into ~12 rolls and place into greased pan. I like either a cake dish, glass. Or round cake pans. So 3x4 or a 2xcircles of 5 with one in the center.
10. I havent' decided if I like letting them proof for a bit in the pan. I Think I do, but only for 15-20m.
11. Bake for ~20m.
---
12. Mix all this stuff together to get your cream cheese frosting. Mix until smooooooth.
13. Once your rolls are finished baking, spoon the frosting over them, then allow them to cool so you won't burn yourself.
Now, there are a number of acceptable variation. First, a better cream cheese frosting. I like mine cheesier, and a little less frosting than what you get with the above recipe.
---
3oz. Cream Cheese
2T. Softened Butter
1c. XXX Sugar
1/2t. Vanilla
Pinch Salt
(1oz. Ammaretto)
---
Something that I do like doing is, after putting the sugar-cinnamon mixture down, but before rolling, sprinkling about a cup of crushed nuts in the roll. I like doing this in the roll, not on top, so you get nuts with every bite.
Substituting Whole Wheat flour for the white flour is fine too. It gives a wheat-y taste (obviously) and makes the texture a bit heavier, but it's tasty. It requires a bit more kneading to encourage a fine texture, and I would definitely allow the rolls to proof in the pan. I generally sub in:
---
3.5c Whole Wheat Flour
1/2c. Wheat Gluten
---
Last but not least, I'll randomly sub in molasses for some of the white sugar, just because. Try:
---
1/4c. Molasses
1/3c. Sugar
---
Anyway, there ya go.
Countertops and pretty stone
So, I'm taking Geology this term. It's interesting. the first day of class involved a "I am X, I'm studying Y, and I'm taking this class because Z." Well, my Z is "because this is a restrictive elective that I need to graduate, and I like shiny rocks.
Now, segue into another area of my, our, life. enLethe and I are very fond of stone, especially the idea of stone countertops in our kitched. It's pretty, durable, etc. Now, there are a lot of cool stones that can be used for this purpose, most of it isn't actually granite, I've found out. Anyway, what is below is a bit of a summary of a conversation we had regarding this.
First, a single type of stone is not necessary in the kitchen. Countertops and island top can be different. Having more than 2-4 major types of stone may be an issue, due to clashing colours.
What if, instead of large slabs of stone for counter tops, we instead bought a number of small boulders, 1-3 cubic feet at a time, cut and polished them ourselves, then set them into some sort of matrix to act as our counter tops? The matrix itself would have to fit a couple prereqs. It would need to be pretty in and of itself. It would need to be durable. We would also have to be able do this ourselves. This fits nicely. That's right, concrete counter tops. A lot more beautiful than you thought, eh? I'm not sure what else would work as a matrix, though. Resin would be too soft, I think. I can't readily think of any other materials.
The next idea we can up with was two part. First, we posit that we are using slab stone for our countertops, though this is not necessary, we could just as well be using the idea described above. Now, this idea is focusing on the area between the backsplash of the countertops, and the bottom of the cabinets. I'll term this area the "extended backsplash." Anyway, if we decided that, for some reason, the above-method was unfeasable for countertops, we could do something similar for the extended backsplash. A lot of the area I'm speaking of is either tiled or made of painted cement board. In this case, we have three options. Either use the above option of larger pices of polished, pretty stone, though this has the issue of large spaces between them, or we could get the 4"x4" countertop samples, cut, polish, and bevel them, and use them as tiles, insead of plain old ceramic. Finally, the third option could be a combination of the two- using large pieces of stone embedded in the stone sample tile work, in a mosaic-esque fashion.
So, the main problems that I see are as follows. First, these projects will involve a significant outlay of funds for the proper tools for the job. That's ok, because both enLethe and I feel that it's much better to get our own tools, and build/make most of what we want, rather than buying a finished, possibly shabby and/or exorbitant product. Second, and a much greater issue, involves technical issues with the matrix that the stone would be set in. Shrinkage and sealing at the stone-matrix boundary could cause quite a headache. Additionally, making sure that none of the matrix material ends up obscuring the pretty stone that's being embedded may be a challenge as well. Then there's the variable hardnesses that maybe cause unequal erosion of the surface over time, or the ability of the finished product to stand up to a regriding/polishing while in place.
Hmmmmmm.
13 February, 2008
Voting and the CAP
Howdy folks.
I should be doing homework right now, so I'm going to make a quick post.
First, CAP = Collective Action Problem. This is a phenomena where a single person's incentive to take some sort of action is so small, they don't do it.
Voting is a prime example of this. Any single person's vote is, basically, irrelevant. The problem is, if no one votes, things break.
I know this, but I still don't feel the need to vote, even though I know I should.
Alas.
30 January, 2008
more Star Wars!
I found out about these Lego Stormtroopers in December. I've been very good and not bought any despite having a weakness for SW stuff. But I figure that if I'm going to collect anything it has to be really neat- you know, like SW stuff. >.> Now if only people would get the hint and get me stuff like that instead of things a-la-girly-bath-and-body-products.
maybe it's just a phase... again
I'm having another stage of Star Wars obsession- they do tend to come and go- and it's not really helping me get things done for real life.
There are 3D puzzles. Over break I built the Imperial Star Destroyer, and I'm still working on the Millennium Falcon at home. Now I find that there's an R2D2 and a model an Anakin's Jedi Fighter that I'd never even seen before I found them online tonight. You know, while I should have been working.
Banik went and got me playing the SW Pocket Model TCG (trading card game, for those like me who had no reason to know that). First it was a pack so that I could build the little ships in it; they are SW after all. Then it was another pack because the ships were neat. Then it was 4 more because when he talked me into trying to play with only 2 packs we really didn't have enough ships and cards to do much. Now he's hoping that this is the gateway drug into me actually taking up miniature gaming, and I'm hoping that I don't just keep buying and building these neat little starships. Oh, and they have a ground assault version. Guess how many packs you have to buy to get yourself an AT-AT model.
Banik also has this book that I've been reading about the behind-the-scenes stuff. Because what I really need is even more esoteric SW trivia knowledge. And he's been mentioning all the SW novels; since I read a few years ago it's rather piqued my interest in them again.
I've watched all the movies in the last week or so, and if I'd had time I probably would've watched all the extras as well. I've also been poking around on a few of my more preferred SW webpages, but I shouldn't talk about that now. I think I'm in enough trouble as it is. Maybe I'll go photoshop something.
24 January, 2008
Coming Soon!
We will get our respective acts together and post something.
We've been... busy. And we have a lot to talk about if only we can remember what it is that we should be posting about. Coming Attractions include:
Restaurants!
Shaharazade's in Shep
The Anvil in Harpers Ferry
Thai Hut in Martinsburg
Asian Garden in Martinsburg
The Three Birds in Corning
Wegmans in Corning
Empire China in Martinsburg (which is probably the wrong place, but I never remember the name >.>)
Viva Mexico in Inwood
Cyros in .... wherever it is
Actual Cooking!
Adventures with Wheat Bread
Fun with Pizza Stones
Milkshake Machines and Disappointment
Sweet Potato Fries, Mandolins (not the kind you play), and Learning Curves
Other Things We Frantically Try to Cook Before Returning to School
And Also!
The Corning Museum of Glass
The Hillcrest Manor
Dr. Frank's Vineyards
Bully Hill Vineyards
Subscribe to:
Posts (Atom)